How to use PhyOSC

1. Install

1.1PhyOSC System Requirements

PhyOSC requires Apple Watch and iPhone.
The required operating environment is as follows:

Apple Watch : watchOS 9 Apple Watch Series6 or higher recommended
iPhone : iOS 16 iPhone 8 or higher recommended

Apple Watch must be paired with iPhone.
iPhone must be connected to Wifi.

Other required environment
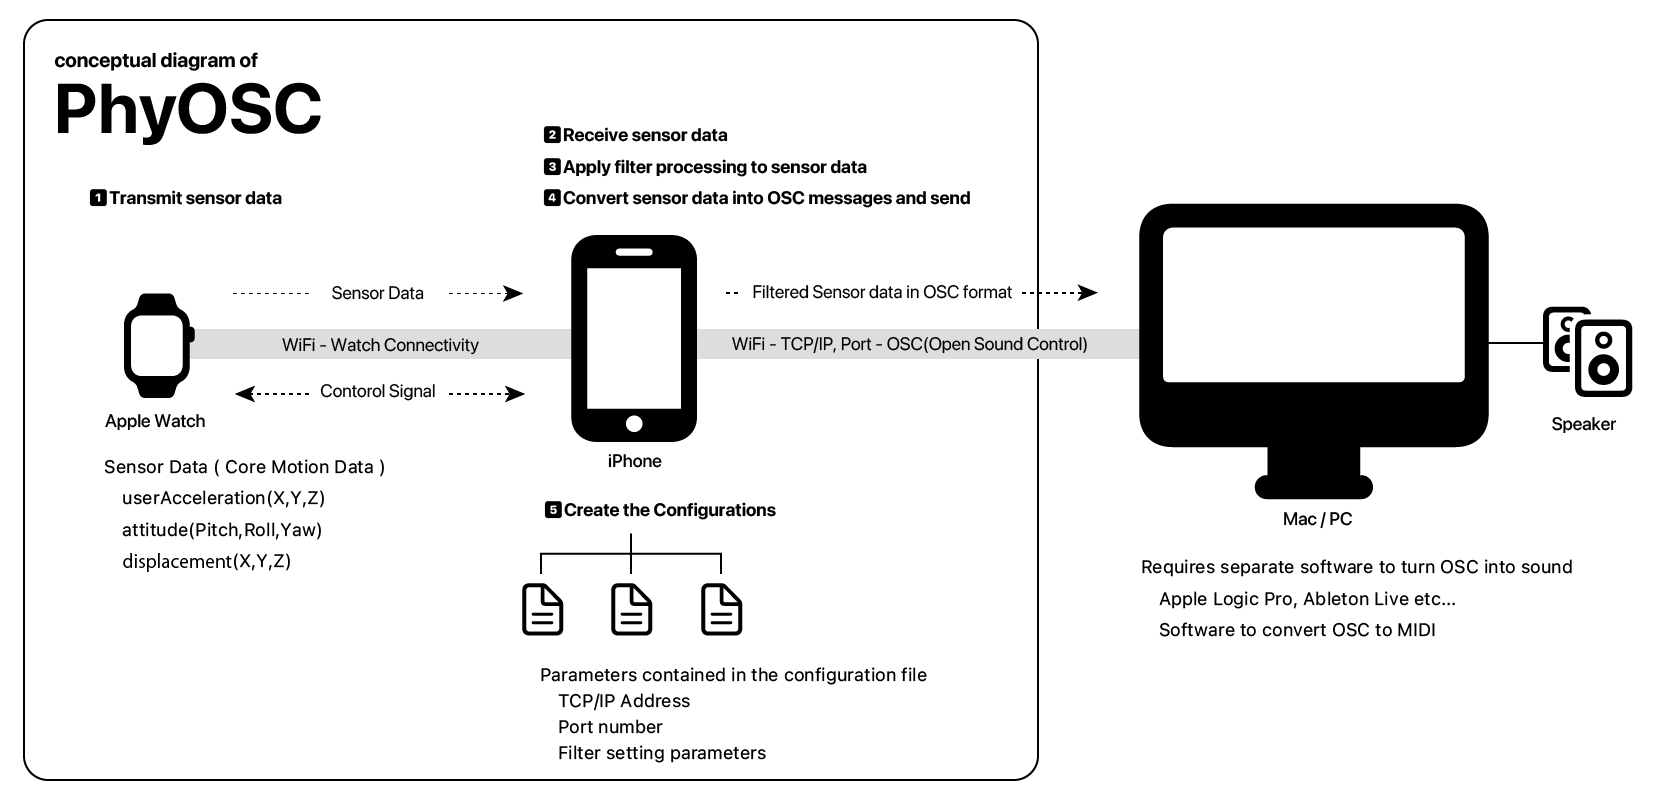
PC(Mac/Windows/Linux ) with a DAW(Digital Audio Workstation: Ableton Live, etc.) installed that are connected to Wifi and can convert OSC messages to sound.

Note : Communication between any TCP / IP address and Port number must be allowed.

Concept

1.2PhyOSC screen related diagram

Install
Install

2. Connection

2.1Connecting the Apple Watch to iPhone

Connection

If the light still does not come on, close the PhyOSC application and start it again.
The indicator will disappear when the Apple Watch goes to background.The indicator does not disappear when OSC is transmitting, even if it goes to background.


2.2Checking the reception status

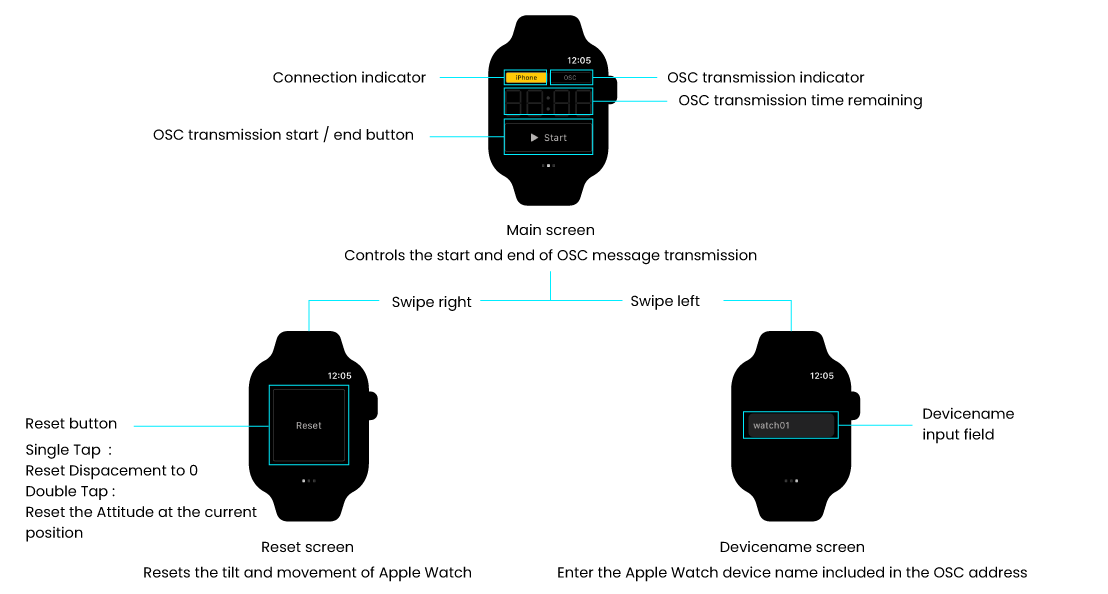
When the connection is completed, the "Data reception indicator" on the iPhone "Main screen" will blink in sync with the movement of the Apple Watch.
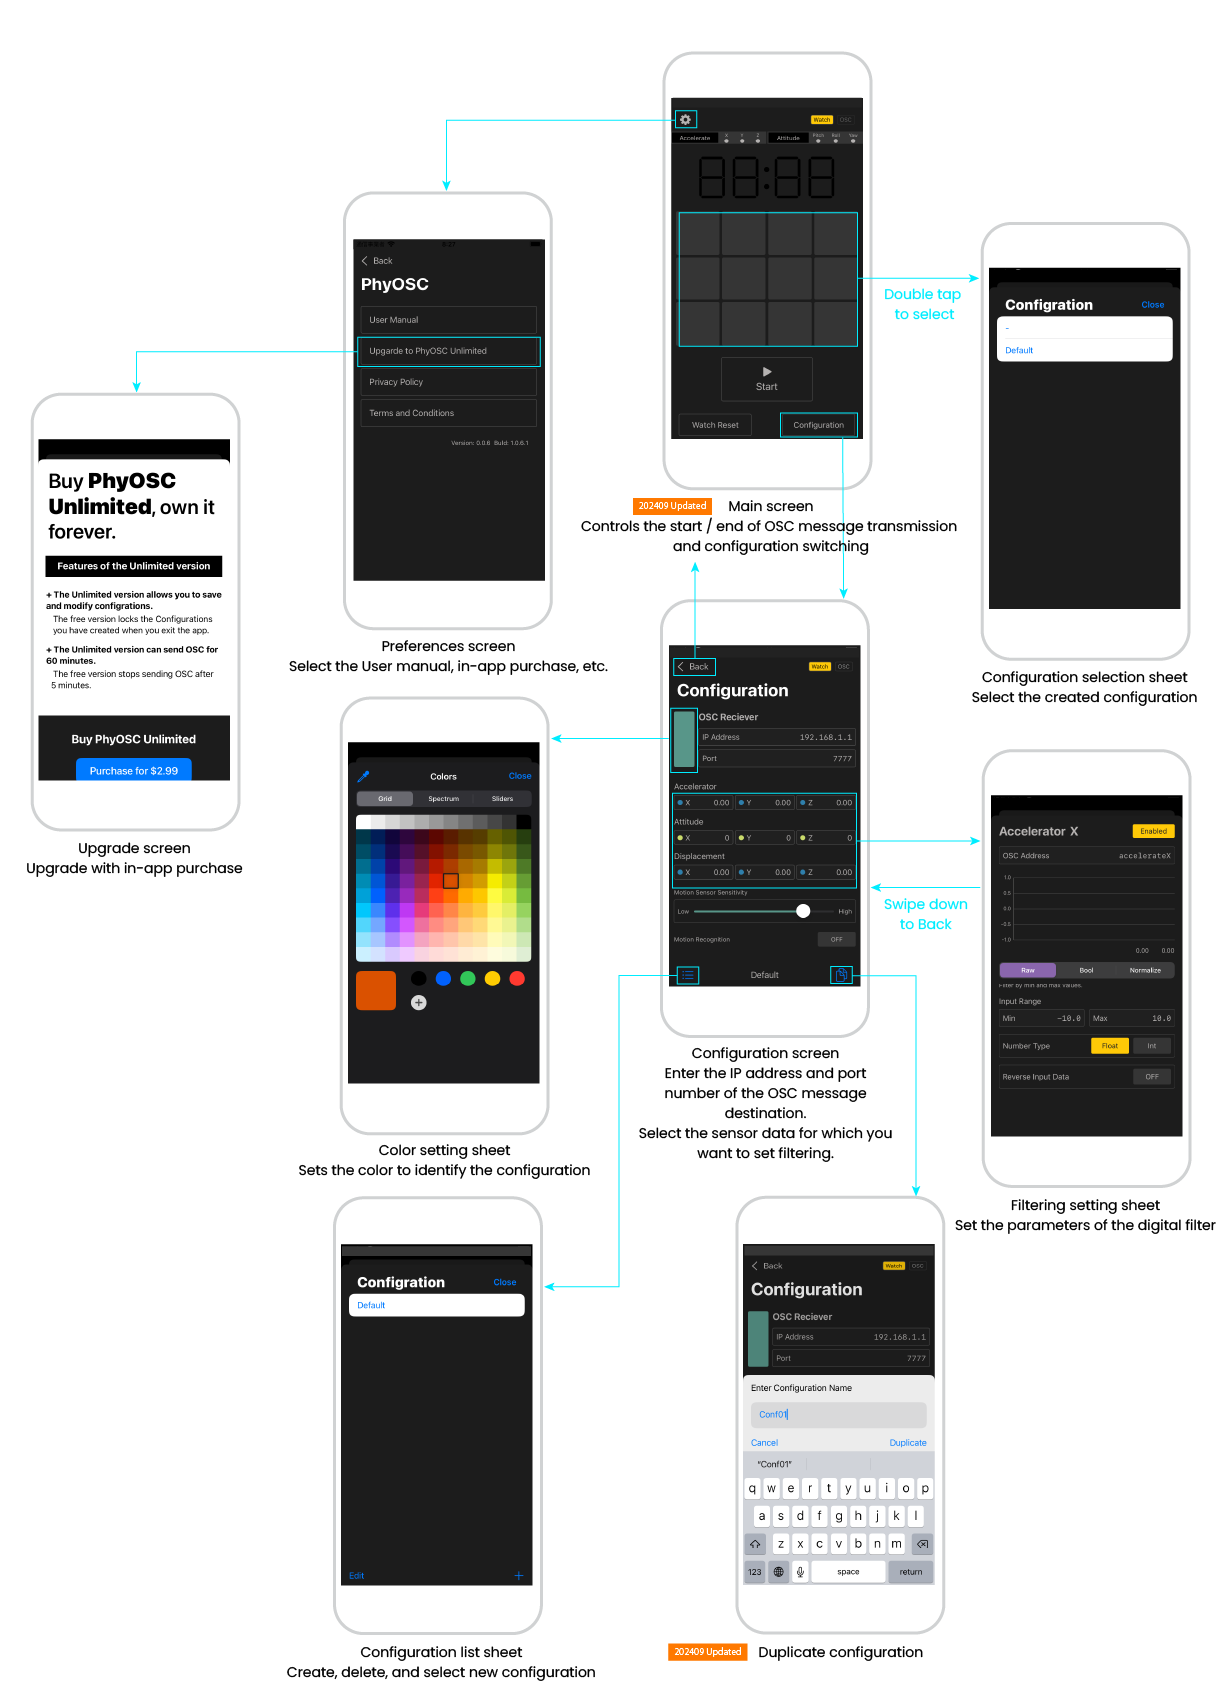
Tap "Configration" at the bottom right of the "Main screen" to display the "Configuration screen", and the data for each sensor is displayed numerically there.

Connection
Displacement (the amount of movement of the Apple Watch) is calculated relative to the Apple Watch's acceleration data and angular velocity data using the PDR (Pedestrian Dead Reckoning) method. Displacement can be disabled with a toggle switch since both data have uncertain areas and are prone to errors.

3. OSC

3.1OSC message destination settings

Enter the IP address and Port number of the server that receives the OSC

Enter the IP address and Port number on the "Configuration screen".

Connection
Note : IP address and Port number are not checked for connection. No warning will be displayed even if you make a mistake.

3.2OSC Data Format

OSC ADDRESS
1st address Cannot be changed
2nd address Apple Watch device name
It can be changed with the PhyOSC app on the Apple Watch side.
3rd address Configuration name
4th address Sensor name or name of machine-learned arm movement
Data Sensor data:Filtered sensor data
machine-learned data:Raw sensor data sent from AppleWatch [Acceleration in X direction、Acceleration in Y direction、Acceleration in Z direction、Pitch、Roll、Yaw]
Connection
Connection

3.3Sensor name and data type

# Sensor name/Machine-learned name rgument Whether the address name can be changed
1 accelerateX Acceleration in X direction
2 accelerateY Acceleration in Y direction
3 accelerateZ Acceleration in Z direction
4 attitudeX Angular Pitch
5 attitudeY Angular Roll
6 attitudeZ Angular Yaw
7 displacementX Amount of movement in X direction
8 displacementY Amount of movement in Y direction
9 displacementZ Amount of movement in Z direction
10 RainbowL Machine-learned arm movements ×
11 RainbowR Machine-learned arm movements ×
12 HorizonL Machine-learned arm movements ×
13 HorizonR Machine-learned arm movements ×
14 PendulumL Machine-learned arm movements ×
15 PendulumR Machine-learned arm movements ×
16 TwistL Machine-learned arm movements ×
17 TwistR Machine-learned arm movements ×
18 WheelF Machine-learned arm movements ×
19 WheelB Machine-learned arm movements ×
20 Up Machine-learned arm movements ×
21 Punch Machine-learned arm movements ×

3.4Start OSC transmission

To start sending OSC, tap "Start" on the "Main screen". To stop sending, tap "Stop" (double tap when operating on Apple Watch).
Even if PhyOSC goes into suspend mode and the screen goes off, the OSC message will continue to be sent.

OSC START

OSC START
Note : OSC transmission will stop when the "Configuration Switch" is unselected or in standby on the main screen.
OSC Pause

How to check OSC messages
You can install the following apps on Mac/Windows/Linux to monitor OSC messages.

Protokol - https://hexler.net/protokol


3.5Reset

Swipe right on the Apple Watch "Main Screen" to display the "Reset Screen". Tap the "Reset button" once to reset Attitude, and two tap to reset Displacement.

Reset
Reset

4. Digital Filters

4.1Set the digital filter

PhyOSC can convert the sensor data sent from the Apple Watch directly into OSC messages, or it can process the data with digital filters. There are three types of digital filters: Raw, Bool, and Nomalize.
For example, Pitch, one of the angular rate sensor data of Apple Watch, is in the range of -90 to +90 degrees, but it can be filtered as follows.

# Filter Name Example of use
1 Raw OSC messages only data in the range -45 to +45.
2 Bool OSC message 1 for positive values and 0 for negative values.
3 Normaization Normalize -90 to 90 data to 0-127
Filter

Digital filters can be set for Accelaration's X, Y, Z and Attitude's Pitch, Roll, Yaw, and Displacement's X, Y, Z respectively.
In addition to these three, there is an "Input range" to specify the minimum and maximum values, a "Number type" to convert to a Float/Integer, and a "Threshold" for the Attitude threshold.

# Filter Name Function
4 Input range The data between min and max is used as the OSC message.
5 Number type Converts the data part of the OSC message to Float or Int type.
6 Threshold Compares the Attitude input data with the previous data and sends an OSC message when the difference is greater than or equal to the threshold.
Filter

4.2Raw filter

Raw filter applies "Input Range" and "Number type" and "Reverse Input Data" filter to the input data.

Input Range
Sets the range of inputs to filter. When Min is set to -10.0 and max is set to 10.0 in the minimum / maximum value input fields, -10 is output if the sensor value is less than -10.0. Outputs 10 if the sensor value is greater than 10.0.

Number Type
Converts the output to a real number or an integer.

Reverse Input Data
Reversals the polarity of the sensor value.

Raw Filter

4.3Bool filter

Bool filter sends 0 or 1 according to the following three conditions.
When the minimum value is set to -20 and the maximum value to 20 using the slider as shown in the figure below, 0 is output when the sensor value is less than -20 or greater than 20, and 1 is output when the sensor value is between -20 and 20.

Bool Range Filter

Input Range
Set the minimum and maximum values for the judgment range slider.

Reverse Range
Reverses the setting of the judgment range specification slider.
When Reverse Range is turned on, 0 is output when the sensor value is -15 to 15, and 1 is output when the sensor value is -15 or less or 15 or more.
The range of the slider itself is synchronized with the Input Range. When the min of Input Range is -20 and max is 20, as shown in the above figure, the minimum and maximum values of the judgment range specification slider are also -20 and 20.

Reverse Input Data
Reversals the polarity of the sensor value.


4.4Bool Less than filter

Outputs 1 when the sensor value is less than the slider specifying the judgment range, and 0 when the value is greater.

Input Range
Sets the minimum and maximum values for the slider to specify the judgment range.

Number Type
Converts output to a real or integer number.

Reverse Input Data
Reverses the polarity of the sensor value.

Bool LT Filter

4.5Bool Greater than filter

Outputs 1 when the sensor value is greater than the slider specifying the judgment range, and 0 when the value is less than the slider.

Input Range
Sets the minimum and maximum values for the slider to specify the judgment range.

Number Type
Converts output to a real or integer number.

Reverse Input Data
Reverses the polarity of the sensor value.

Bool GT Filter

4.6Normalize filter

Normalize filter normalizes the input data to the "Nomarization" Min to Max range.

Input Range
Sets the range of input to be normalized.

Nomalization
Normalizes the input specified by Input Range within the min to max range of Normalization.
As shown in the figure to the right, if the min and max of Input Range are set to -10 and 10, respectively, and the min and max of Normalization are set to 0 and 127, respectively, the input value of 0 is output if the input value is less than -10. If the input value is 0, 64 is output; if the input value is greater than 10, 127 is output.

Number Type
Converts output to a real or integer number.

Reverse Input Data
Reverses the polarity of the sensor value.

Normalize Filter

Output example when Min / Max of "Input Range" is set to -3.00 / 3.00 and Min / Max of "Nomarization" is set to 0/127.

Input Data OutPut Data
-4.00 Do not send OSC messages
-3.00 0
0 63.5
3.00 127
4.00 Do not send OSC messages

4.7Set the Attitude threshold

Attitude's X, Y, and Z can be filtered by thresholds.
The sensor data received from the AppleWatch is compared with the previous date, and OSC is sent when the difference is greater than the threshold value.
If you increase the threshold value, you can ignore the minute movement of Apple Watch. On the contrary, a smaller threshold value allows Apple Watch to react to minute movements.
Threshold

5. Sensor sensitivity

Use the Motion Sensor Sensivity slider to adjust the parameters that determine whether the Apple Watch is physically moving or stopped. When set to Low, the threshold for judging braking is increased and slight movements are ignored. Set to High, even slight movements will be processed. To obtain the intended OSC data, it is important to adjust the arm motion(velocity and acceleration) and Motion Sensor Sensivity slider value.

Sensitivity

6. Machine learning

PhyOSC has been trained in advance with 12 types of arm movements by machine learning. When it recognizes the same arm movement as the learned activity, it sends OSC data according to the movement.
The machine learning data is trained with Sample Rate = 15 and Predicion Window Size = 15, so 1 second is needed to recognize the arm movement.

To use motion recognition by machine learning function, turn on "Motion Recongnition" in Configration screen.

Motion Recongnition
Apple Watch and arm

Digital Crown toward your shoulders

Wear the Apple Watch with the Digital Crown facing your shoulders. If you wear it in the opposite direction, the top, bottom, left, and right judgments of machine learning will be reversed.

Set the orientation of Apple Watch in "General" and "Orientation" of the "Settings" app. While exercising, set "Return to Clock" from "General" in the "Settings" app to "After 1 hour".
To prevent the background from moving during PhyOSC Configuration settings, set "Wake Duration" from "Display & Brightness" in the "Settings" app of Apple Watch to "Wake for 70 Seconds".

OSC Address
Arm movements

/PhyOSC/2nd address/3rd address/RainblowL

Extend your arm toward the ceiling and move it from the 2 o'clock position on the clock to 10 o'clock.
The palm of the arm outstretched to the sky should always point forward.

/PhyOSC/2nd address/3rd address/RainblowR

Extend your arm toward the ceiling and move it from the 10 o'clock position on the clock to 2 o'clock.
The palm of the arm outstretched to the sky should always point forward.
Rainbow
OSC Address
Arm movements

/PhyOSC/2nd address/3rd address/HorizonL

Extend arms horizontally to the ground at shoulder height and swing from right to left while remaining horizontal.
The palm of the horizontally extended arm should always face the ground.

/PhyOSC/2nd address/3rd address/HorizonR

Extend arms horizontally to the ground at shoulder height and swing from left to right while remaining horizontal.
The palm of the horizontally extended arm should always face the ground.
Horizon
OSC Addess
Arm movements

/PhyOSC/2nd address/3rd address/PendulumL

Lower your arms perpendicular to the ground, palms facing your knees. Swing your arm from the 3 o'clock position to the 9 o'clock position like a pendulum clock.
Always point the palm of your vertically lowered arm toward your body.

/PhyOSC/2nd address/3rd address/PendulumR

Lower your arms perpendicular to the ground, palms facing your knees. Swing your arm from the 9 o'clock position to the 3 o'clock position like a pendulum clock.
Always point the palm of your vertically lowered arm toward your body.
Pendulum
OSC Address
Arm movements

/PhyOSC/2nd address/3rd address/TwistL

Lower your arm and rotate your wrist counterclockwise

/PhyOSC/2nd address/3rd address/TwistR

Lower your arm and rotate your wrist clockwise
Twist
OSC Address
Arm movements

/PhyOSC/2nd address/3rd address/Punch

Stick your fist from your shoulders parallel to the ground like a boxing straight punch.
Punch
OSC Address
Arm movements

/PhyOSC/2nd address/3rd address/Up

Lower your arms vertically and raise your fists above your head.
Up
OSC Address
Arm movements

/PhyOSC/2nd address/3rd address/WheelF

Stretch your arms to the heavens and swing your arms down like a ball throws.
The palm of the arm extended above the head is turned forward, and the arm is shaken like a swimming crawl.
Wheel Front
OSC Address
Arm movements

/PhyOSC/2nd address/3rd address/WheelB

Swing your arms up like a softball pitcher throws.
The palm of the lowered arm is turned forward and the arm is shaken like a backstroke of swimming.
Wheel Back

7. Configuration

The OSC receiving server IP address / Port and digital filter set in the "Configuration screen" can be saved as a configuration.
The iOS device will convert the sensor data received from the Apple Watch into an OSC message and send it according to this configuration.
You can create and save multiple Configurations, but it cannot use multiple Configurations at the same time.
For details, refer to 7.4 Switching Configurations.


Caution : In the free version, there is a limitation that when you exit the PhyOSC app, you will not be able to load configurations created by users other than Default. It is possible to create a new one. Updating with in-app purchase removes this limitation.


7.1Create New

Tap the + at the bottom right of the "Configuration Screen" and enter a name for the configuration.

New

7.2Modified

Tap + at the bottom left of the "Configuration screen" and select the configuration you want to modify from the created configuration list that appears.

Modified

7.3Duplicate

This will duplicate the currently displayed configuration.
Tap the in the bottom right corner of the Configuration screen. Enter the configuration name and tap Duplicate.

Duplicate

7.4Delete

Tap format_list_bulleted at the bottom left of the Configuration Screen and swipe left on the configuration you want to remove from the created configuration list that appears.

Delete

7.5Switching Configurations

You cannot use multiple configurations at the same time, but it can switch between them.

7.5.1Put the configuration on the "main screen"

Double-tap any "configuration button" on the "main screen" to display the "configuration selection list", and select the configuration to be placed on the "main screen".
The selected configuration is displayed in the "Configuration switch button" of the "Main screen", but it cannot be used in this state yet.
To enable the selected configuration, tap the "Configuration Switch Button" to enable it.
Furthermore, if you tap the "configuration switch button" again, it will be disabled.

Swich

7.5.2Put the second configuration

Put the second configuration Tap the "configuration switch button" and select the configuration.

Put the second configuration

7.5.3Switch configurations

You can switch the configuration by tapping the "configuration switch button" registered on the "main screen".

7.5.4Change the color of the configuration switch button

You can improve visibility by changing the color of the "configuration switch button" registered on the "main screen".
Tap the configuration switch button to change the color, then tap the "configuration" setting button at the bottom right of the screen to display the "configuration" screen.
Next, tap the "Color selection button" on the "Configuration screen", select a color on the "Color selection" sheet that appears, and finally tap "Done".

Change color

7.5.5Deselect the configuration registered in the "configuration switch button"

Double-tap the "configuration switch button" to display the "configuration selection list", and Tap - to deselect.

Deselect

8. Upgrade to PhyOSC Unlimited(in-app purchases)

PhyOSC is a free app, but in-app purchases will improve its functionality.
The difference between the features of the free version and the upgraded version is the length of continuous transmission time of OSC and whether the created configuration can be reused.

Purchase

Difference between free version and upgraded version

OSC message continuous transmission time Configuration
Free version 5 minutes When you exit the PhyOSC app, you will not be able to load any configurations other than Default.
It is possible to create a new one.
Upgraded version
PhyOSC Unlimited
60 minutes There are no configuration restrictions.
The configuration created in the free version will also be valid.

9. Limitations

  • Can't run PhyOSC by pairing multiple Apple Watches on a single iOS device at the same time.
  • If the Apple Watch is moved at a low speed or conversely at a high speed, the data will not be measured correctly.
  • Displacement (the amount of movement of the Apple Watch) is calculated relative to the Apple Watch's acceleration data and angular velocity data using the PDR (Pedestrian Dead Reckoning) method. Displacement can be disabled with a toggle switch since both data have uncertain areas and are prone to errors.
  • The accuracy of machine learning recognition is not 100%.Incorrect results may be output depending on the speed and angle of arm movement.We continue to research the latest research and look for new approaches to improve accuracy.